A Beginner's Guide to Kubernetes
In 2026, Kubernetes is no longer an emerging technology or a niche platform for early adopters. According to the latest CNCF Annual Cloud Native Survey, 82% of organizations using containers now run Kubernetes in production, and it has become the default platform for running modern AI workloads at scale. This is why, regardless of whether you’re a developer, DevOps engineer, or engineering leader, it’s helpful to have some understanding of what it is and how it works. In this guide, we’ll focus on learning the basics of Kubernetes and the core resources you’ll encounter in most clusters.
Prerequisite: Knowing what a container is
What is Kubernetes?
To put it in very simple terms, Kubernetes is a system for running and managing applications that are packaged in containers. Instead of manually starting containers, handling failures, or figuring out how to scale things, you describe what you want the deployment of your application to look like, and Kubernetes works to keep it in that state.
This is what people mean when they say Kubernetes is declarative. You don’t tell it how to do things step by step. Instead, you declare a desired outcome, like “run three replicas of this microservice” or “make this service reachable over the network,” and Kubernetes figures out how to get there.
Behind the scenes, Kubernetes does this through reconciliation loops. Kubernetes has controllers that continuously compare the desired state you declared with the actual state of the cluster. If something drifts - for example, a container crashes - Kubernetes notices the mismatch and takes action to reconcile the two, such as restarting the container or spinning up a new one. It is important to understand that Kubernetes itself doesn’t provide or run the underlying machines. Your application code still runs inside containers on machines which you need to provision, which Kubernetes calls nodes. Kubernetes’s role is to manage and coordinate those machines and schedule containers on them to run.
What Makes Up a Kubernetes Cluster
A Kubernetes cluster is made up of two main parts: the control plane and a set of worker nodes. Together, they’re responsible for deciding what should run and where it actually runs.
The control plane is the brain of the cluster. It exposes the Kubernetes API, stores the desired state of the system, and runs the controllers that handle reconciliation. So when you apply a configuration, scale a workload, or update a setting, you’re talking to the control plane. It records your intent and continuously works to make sure the cluster matches it.
Worker nodes are the machines that actually run your application containers. Each node runs a container runtime and a set of Kubernetes components that communicate with the control plane. When the control plane decides a container should run, it schedules it onto one of these nodes, and the node is responsible for starting it, monitoring it, and reporting its status back.
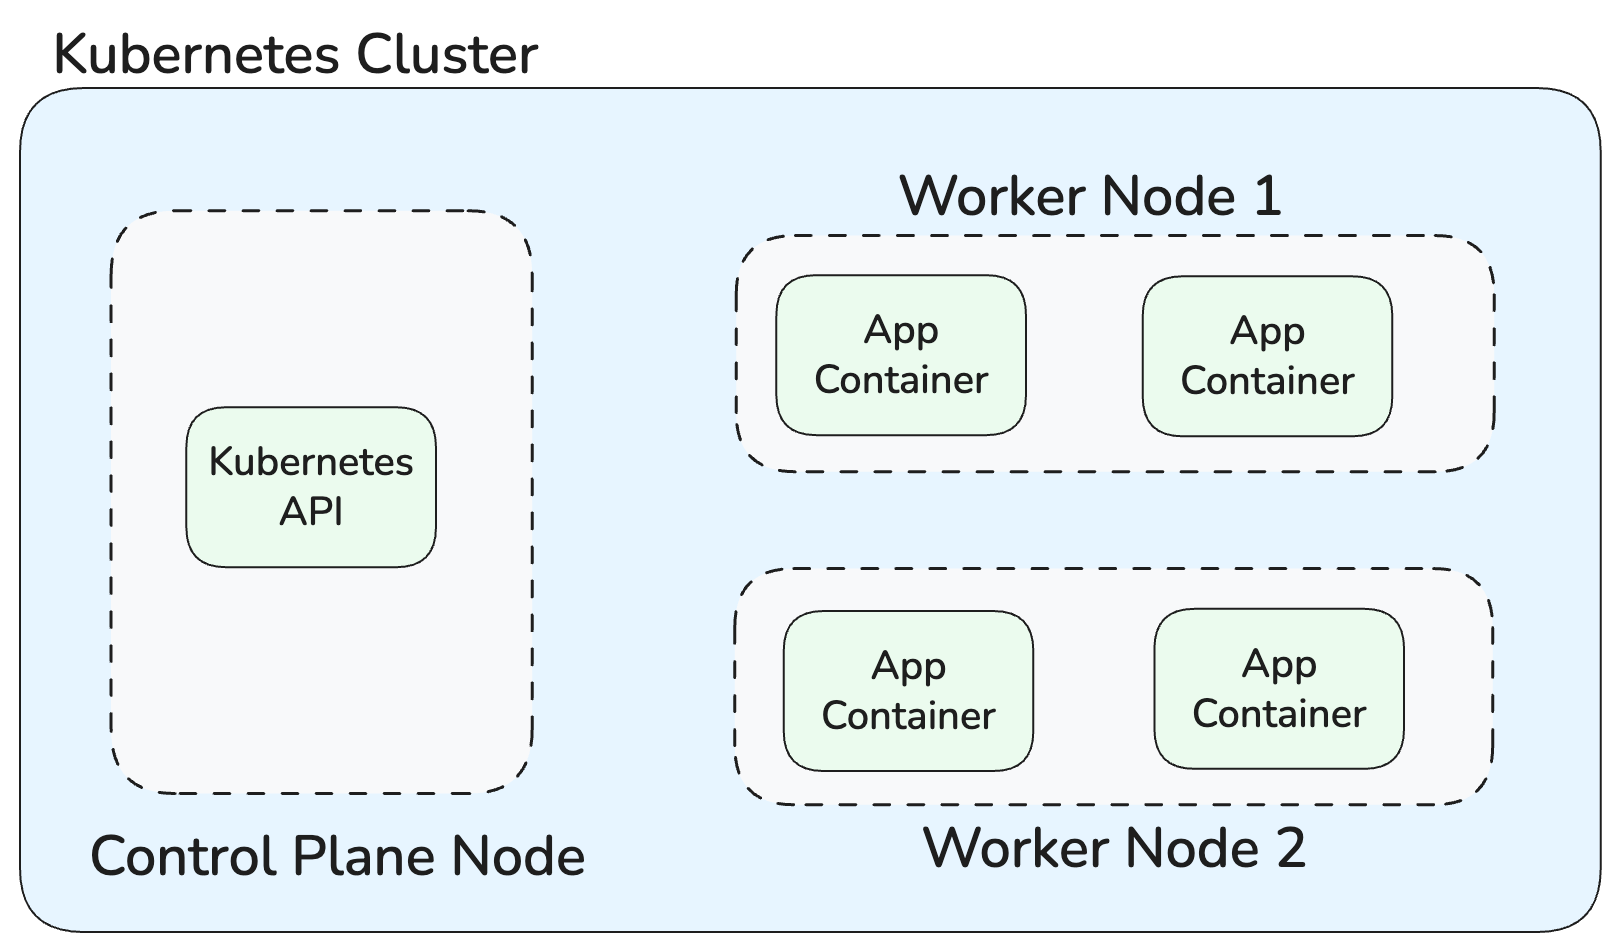
Architecture of a simple Kubernetes cluster
One important thing to understand is that in most cases, you won’t have to manage these pieces directly. You’ll probably use a managed Kubernetes offering like Google’s GKE or AWS’s EKS. In these managed offerings, the control plane is typically operated for you, and nodes are often created automatically.
Kubernetes Resources You Should Know
Kubernetes exposes its functionality through a set of building blocks called resources, sometimes also referred to as objects. You don’t interact with containers or machines directly, instead, you define and manage these resources, and Kubernetes uses them to understand how to deploy your application. In this section, we’ll learn some of the core Kubernetes objects you need to know.
Pods
Kubernetes doesn’t run containers directly. It wraps them in a resource called a “Pod,” which is the smallest unit Kubernetes knows how to manage. Pods can contain a single container or multiple containers, and all containers running within the same Pod share the same networking and storage context.
Here’s what a simple YAML configuration defining a Pod looks like:
apiVersion: v1
kind: Pod
metadata:
  name: example-pod
spec:
  containers:
    - name: app
      image: nginx:latest
      ports:
        - containerPort: 80
This configuration declares that a Pod named example-pod should exist, running a single container based on the nginx image and listening on port 80. Once applied, Kubernetes continuously works to ensure that a Pod matching this description is running in the cluster.
It’s important to understand that Pods are not designed to be long-lived. If a Pod fails or needs to be moved to another node, Kubernetes creates a new one rather than trying to fix or move the existing one. Because of this, managing individual Pods directly doesn’t scale well. To handle this, Kubernetes provides higher-level resources that manage groups of Pods for you.
These resources maintain the desired number and type of Pods, automatically creating, replacing, or removing them as needed to match the state you declared. For stateless workloads, this is typically done using Deployments.
Deployments
A Deployment is a higher-level resource that manages a set of identical Pods. You declare how many Pod replicas you want, which container image to run, and how updates should be rolled out. Kubernetes then makes sure the desired number of Pods are running and keeps them up to date over time.
Behind every Deployment sits a ReplicaSet. The ReplicaSet’s job is simple: ensure that a specific number of matching Pods are running at any given time. If a Pod crashes or is deleted, the ReplicaSet creates a replacement. Similarly if you scale the Deployment up or down, the ReplicaSet adjusts the number of Pods accordingly. But ReplicaSets are only responsible for keeping a fixed number of Pods running. Deployments build on top of ReplicaSets to manage how applications change over time, adding support for rolling updates, rollbacks, and version history. This is why Deployments are the standard way to run and update applications in Kubernetes.
Here’s what a YAML manifest to tell Kubernetes to create a Deployment looks like:
apiVersion: apps/v1
kind: Deployment
metadata:
  name: example-deployment
spec:
  replicas: 3
  selector:
    matchLabels:
      app: example
  template:
    metadata:
      labels:
        app: example
    spec:
      containers:
        - name: app
          image: nginx:latest
          ports:
            - containerPort: 80
This manifest declares a Deployment called example-deployment that should always run three identical Pods. The template section defines the Pod specification, which should look familiar from the earlier Pod example. Kubernetes uses the label selector (matchLabels) to associate the Deployment with the Pods it manages.
Services
We learned earlier that in Kubernetes, Pods are meant to be ephemeral, which means their IP addresses are ephemeral as well. This makes it impractical to connect to the Pods of a particular microservice directly. Services solve this problem.
A Service provides a stable network endpoint for a set of Pods. Instead of targeting individual Pod IPs, other parts of the system communicate with the Service, and Kubernetes takes care of routing traffic to one of the matching Pods behind it. This decouples how microservices communicate from the lifecycle of individual Pods.
Services work by selecting Pods based on labels. As long as a Pod matches the Service’s selector, it becomes part of the traffic pool. When Pods are added or removed, the Service updates itself without any manual intervention.
Here’s a simple example of a Service definition:
apiVersion: v1
kind: Service
metadata:
  name: example-service
spec:
  selector:
    app: example
  ports:
    - protocol: TCP
	    port: 80
      targetPort: 80
  type: ClusterIP
This Service exposes port 80 and forwards traffic to port 80 on any Pod with the label app: example. The ClusterIP type means the Service is only accessible from within the cluster, which is the most common setup for internal communication between services.
Kubernetes supports different Service types depending on how traffic should enter the cluster. ClusterIP is used for internal access, while NodePort and LoadBalancer expose services externally.
ConfigMaps and Secrets
Applications need things like environment variables, credentials, and API keys. In Kubernetes, this kind of configuration is handled using ConfigMaps and Secrets. A ConfigMap is used to store non-sensitive configuration data, such as application settings or URLs. A Secret serves the same purpose but is intended for sensitive data like passwords, tokens, and certificates.
The purpose of both ConfigMaps and Secrets is to let you decouple configuration from container images. This means you can change configuration without rebuilding or redeploying your application image.
Here’s a simple ConfigMap example:
apiVersion: v1
kind: ConfigMap
metadata:
  name: app-config
data:
  PLAYER_INITIAL_HEALTH: "100"
  API_URL: https://api.example.com
And a Secret:
apiVersion: v1
kind: Secret
metadata:
  name: app-secrets
type: Opaque
data:
  DB_PASSWORD: cGFzc3dvcmQ=
On their own, these resources don’t do anything, you usually have a Pod or Deployment referencing them. One common approach is to expose values as environment variables inside the container.
Here’s how a Pod can reference ConfigMaps and Secrets:
apiVersion: v1
kind: Pod
metadata:
  name: example-pod
spec:
  containers:
    - name: app
      image: mygameapp:latest
      env:
        - name: PLAYER_INITIAL_HEALTH
          valueFrom:
            configMapKeyRef:
              name: app-config
              key: PLAYER_INITIAL_HEALTH
        - name: DB_PASSWORD
          valueFrom:
            secretKeyRef:
              name: app-secrets
              key: DB_PASSWORD
In this example, the container doesn’t need to know anything about Kubernetes internals. It simply sees PLAYER_INITIAL_HEALTH and DB_PASSWORD as normal environment variables at runtime. Kubernetes is responsible for pulling the values from the ConfigMap and Secret and injecting them into the Pod.
Volumes
Containers running in a Pod in Kubernetes are also meant to be ephemeral. When a container restarts, anything written to its filesystem is lost. In cases where you need your application to persist data or share files between containers, Kubernetes provides a solution in the form of volumes.
A volume is a directory that’s mounted into a Pod and made available to one or more containers. Unlike a container’s filesystem, a volume can outlive individual container restarts and be shared between containers in the same Pod. Kubernetes supports many volume types, ranging from simple temporary storage to cloud-backed persistent disks.
Here’s a simple example using an emptyDir volume, which provides temporary storage that exists for the lifetime of the Pod:
apiVersion: v1
kind: Pod
metadata:
  name: volume-example-pod
spec:
  volumes:
    - name: shared-data
      emptyDir: {}
  containers:
    - name: app
      image: nginx:latest
      volumeMounts:
        - name: shared-data
          mountPath: /usr/share/nginx/html
In this example, Kubernetes creates a directory on the node and mounts it into the container at /usr/share/nginx/html. If the container restarts, the data remains. If the Pod is deleted, however, the volume is removed as well.
For workloads that need data to survive Pod replacement, Kubernetes uses PersistentVolumes. These are usually backed by storage provided by a cloud provider.
Here’s a simplified PersistentVolume definition:
apiVersion: v1
kind: PersistentVolume
metadata:
  name: example-pv
spec:
  capacity:
    storage: 10Gi
  volumeMode: Filesystem
  accessModes:
    - ReadWriteOnce
  storageClassName: ""
  persistentVolumeReclaimPolicy: Retain
  csi:
    driver: efs.csi.aws.com
    volumeHandle: fs-073d77123471b2917
This PersistentVolume declares a 10Gi filesystem volume backed by Amazon EFS. Instead of using local node storage, the volume is provided by a managed network file system (NFS), identified by the volumeHandle.
Workloads don’t use PersistentVolumes directly. Instead, they reference a PersistentVolumeClaim (PVC), which requests storage with specific characteristics:
apiVersion: v1
kind: PersistentVolumeClaim
metadata:
  name: app-data
spec:
  accessModes:
    - ReadWriteOnce
  resources:
    requests:
      storage: 10Gi
Kubernetes matches the PVC to a suitable PersistentVolume and binds them together. Once bound, a Pod or Deployment can mount the claim like any other volume.
Here’s a Deployment using that PVC:
apiVersion: apps/v1
kind: Deployment
metadata:
  name: app-with-storage
spec:
  replicas: 1
  template:
    metadata:
      labels:
        app: app-with-storage
    spec:
      containers:
        - name: app
          image: nginx:latest
          volumeMounts:
            - name: data
              mountPath: /data
      volumes:
        - name: data
          persistentVolumeClaim:
            claimName: app-data
With this setup, Kubernetes ensures that the Pod always gets the same underlying storage, even if it’s restarted or rescheduled. Volumes allow Kubernetes to combine ephemeral containers with durable state, making them essential for stateful applications.
Namespaces
Organizations often deploy different applications on the same Kubernetes cluster and when you do that, you’ll want some level of separation. Namespaces provide that logical boundary inside a Kubernetes cluster. They are commonly used to isolate different teams’ workloads from each other and make it easier to apply policies without needing separate clusters.
Basically, Namespaces are a way to group related resources together. Pods, Deployments, Services, ConfigMaps, and Secrets all live inside a Namespace. When you create or interact with a resource, you’re almost always doing so within a specific Namespace, even if you don’t explicitly think about it.
Here’s a simple Namespace definition:
apiVersion: v1
kind: Namespace
metadata:
  name: team-a
Once a Namespace exists, resources can be created inside it by specifying the namespace field explicitly in the YAML of that particular resource. A Deployment created in the team-a Namespace is completely isolated from one running in team-b, even if they share the same cluster. By default, if you don’t specify a Namespace when creating a resource, it will be created in the default Namespace in your cluster.
It’s important to understand that Namespaces offer logical isolation, not physical isolation. All Namespaces still share the same underlying cluster resources, such as nodes and networking.
Trying Things Out
So far, we’ve only looked at things theoretically, learning about the different types of resources Kubernetes has. But things tend to click much faster once you try them yourself, and the easiest way to do that is by running a local Kubernetes cluster and interacting with it using kubectl.
kubectl is the command-line tool used to talk to a Kubernetes cluster. We’ll now see how to use it to apply the YAML manifests shown above for the different resources. To practice locally, you can use tools like minikube or k3d to spin up a Kubernetes cluster on your own machine. As an example, here’s how to create a local cluster using k3d:
k3d cluster create demo-cluster
Once the cluster is running using the above command, kubectl is automatically configured to talk to it. You can then apply a resource definition like this:
kubectl apply -f deployment.yaml
Kubernetes will read the file, create or update the resources it describes, and start reconciling them to match the declared state. You can inspect what’s running with commands like kubectl get pods or kubectl get deployments.
When you’re done experimenting, you can remove resources just as easily:
kubectl delete -f deployment.yaml
This deletes everything defined in the file and cleans up the associated Pods created by the Deployment as well.
One thing we didn’t cover above is that kubectl can also be used to create resources directly, without writing YAML manifests. For simpler resources that don’t require much configuration, this is often more convenient than creating and managing a separate YAML file. For example, creating a Namespace doesn’t usually require a lot of configuration, so you can create one directly with:
kubectl create namespace team-a
This does the same thing as applying the Namespace YAML file we saw above but is faster. You can still inspect or manage the Namespace later using kubectl, just like any other resource. For more complex resources like Deployments or Services, YAML manifests are generally preferred, since they make the desired state explicit and easy to version and review.
Next Steps
In this guide, we covered what Kubernetes is and the core building blocks you need to be familiar with when deploying an application to Kubernetes. We looked at how containers run inside Pods, how Deployments and ReplicaSets manage those Pods over time, how Services provide stable networking, and how ConfigMaps, Secrets, Volumes, and Namespaces help manage configuration, data, and isolation. These basics are enough to give a rough understanding of how most Kubernetes workloads are structured and to start reasoning about what’s happening inside a cluster without getting lost in the details.
If you want to go deeper from here, working toward a Kubernetes certification like CKAD or CKA can be a good way to build knowledge incrementally. When learning, the Kubernetes documentation is the best place to go if you find yourself wanting to learn more about a specific type of resource or how to use it.